1/25/11

Another workshop

I forgot that I had pictures from our 1-day brief snowfall earlier this month - I think we are very lucky not to have snow every winter...
I even managed to catch Miss Roxie out on the patio - she was very excited!

In my last post, I mentioned I was fortunate to be able to take a workshop from Carol Morrissey - my "photo-to-art-quilt" is still in the very beginning stages, so not much to show yet on that piece -

On 1/22 I was able to take a workshop from JoAnn Musso (on left in photo).
She is one of the most inspiring artists I personally know - she has done custom sewing (including custom wedding gowns) for decades and has done award-winning wearable art for the last 17 years.  She brought a wonderful collection of items she has made that used the technique of embellishing and using scraps...
...and, of course, a lot of my friends were there as well...it's so nice to be in a room full of your friends talking about art and fabric and fiber!
JoAnn provided us with a kit full of wonderful stuff...
But even 5 hours wasn't enough time to get very far...this is all I had to show for it at the end of the day...
It will take time, but whenever it's finished it should count as a project with one of the highest-girlie-points ever!  It's far and above more fru-fru than most of my projects.

Since the workshop was in a Sunday School room at a local church, the room was decorated with children's art - and we all voted this note that was pinned to the bulletin board as one of the best things ever:
Don't you wish life was still that simple?

1/10/11

Quilt Guild

Over the holidays I finished my two mini-quilts for the charity auction to be held at the Quilt Guild's show this March - both are about 12" square:

And, as always, last week's Quilt Guild meeting was very very inspiring - our members are so talented and I think "Bring and Brag" is always the best part of the meeting - I wish I could have gotten pictures of all of them!
 And I'm so glad I was able to hear the guest speaker!  Carol Morissey is incredibly talented (http://www.ocaroldesigns.com/) - here is her picture from the Quilter's Guild website - shown with one of her quilts that is among my favorites:
During her talk, Carol kindly shared a lot of her quilts with us (and, once again, I didn't get shots of all of them)-

I was fortunate to be able to take a workshop with her last Friday and Saturday - it will be a while before you see that project, however!

1/4/11

The Biggest Project Completion

Today, Dave is our Guest Blogger - he did a great job putting together the review of our Upstairs Bathroom Destruction/Construction!


The Great Upstairs Bathroom Re-Do of 2009-2010
We did not begin the Great Bathroom Makeover with a blank slate.  The previous owners of the house had allowed their grandchildren to choose the colors upstairs.  And that choice was: Green. (Before and after pictures of the makeover of another room upstairs can be found at: http://www.appletonstudios.com/HomeOfficeMakeover.htm.)  So here’s what we began with: “The Green Room.”
We began by stripping the wallpaper from the walls and the popcorn ceiling treatment from the ceiling.  The former was not as easy as it sounds; the wall had not been primed before the wallpaper had been applied.
Then came the fun part: Demolition.  Take out the sink, and carefully remove the toilet (since it was the one we were planning on putting back in), and take out the carpet and baseboards.

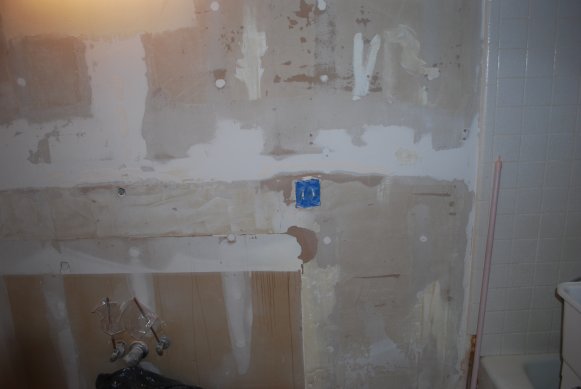
Much time was spent in getting the wallpaper residue and “stickum” off the walls.  Did I mention that the walls had not been primed before the wallpaper had been applied?
Indeed, it took us the best part of a month to get all the remains of the wallpaper off.  Then we could start repairing the damage to the wall and preparing it for priming.
Some plasterwork...
Okay, a LOT of plasterwork...
And then, of course, the sanding.  And marking places that needed more plaster work.
Until finally, we were ready to remove the light fixture, do the necessary wallpaper removal and plaster work behind where it had been, and prime for painting!
Putting the new color on the wall (well, except for across the accent wall, of course).
Painting the sky and clouds on the ceiling took several tries before we got to a point we thought was acceptable.  We are clearly not Italian master painters.
Then it was time to put the Venetian plaster on the accent wall.  Let it dry, then burnish it to make it shine.
Do a little repair work around the tub enclosure, and then install the light fixture.
Then we were ready for Jo to start work on the Lion of St. Mark on the Venetian plaster accent wall.
The accent wall done with the lion painted and the Venetian plaster sealed, it was time to put in the substrate for the tile floor,
cut and arrange the tiles,
mix the mastic and stick ‘em all down, followed by grouting the spaces between them.
Cut and install the new baseboards and threshold, and get the new pedestal sink ready for the plumber to install.  (Copper lines, “above my pay grade”, that is to say, I have had no experience doing them.  So, call the plumber.  Contrary to popular opinion, sometimes I do know my limits.)
The plumber comes, the plumber goes, leaving in his wake ....
Cut and install the crown molding ...
Install the new shower rod, shower curtain (and liner), fixtures, mirror, and towels.
Buy frames and print out a carefully chosen selection of our photographs of Italy to put in them, arrange them on the walls, and by golly! 
We have a new upstairs bathroom- just in time for the New Year!

And, for some odd reason, now he says we'll write a check to somebody for the Master Bath rennovation.  I wonder why he'd say that???

1/2/11

Sunday Stash

Happy New Year to one and all!

The holidays were good - both productive and restful.  And, it just goes to show that patience is rewarded - if you are willing to wait for the sales, it's amazing how much you can increase your stash for a lot less money - and it's especially nice when you have a gift card!

I found holiday fabric on sale...ok...ok...I know they were aiming for that Christmasy-crowd, but I found holidays on sale that were way more suited to me...
I also found a great sale on a color series:
And then I decided to stash-build both fabrics and embellishments (beads, buttons and ribbons) by color - this time out it was all about BLUE...mostly...
I think it's a great start to a year - next up: I actually finished a few projects!